Monday, March 30, 2009

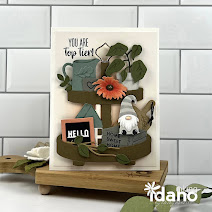
Wagon Full of Fun

Cardstock: Lavender Lace, Chocolate Chip, Bashful Blue, Certainly Celery, Whisper White
Stamp Set: Wagon Full of Fun
Accesssories: Watercolor Crayons, Blender Pens, various Stampin' Write Markers, Certainly Celery Grosgrain Ribbon, Stampin' Dimensionals, Dazzling Diamonds Glitter, Big Shot, Backgrounds 1 Texturz Plates, Scallop Edge Punch

Saturday, March 28, 2009

Tutorial Order Update

I'm back from Spring Break vacation. I'm unpacked and the laundry is almost done but how long does it take to catch up on the sleep??? Who said vacations were for resting!


Our Internet connection at the hotel was pretty bad to say the least, so if you ordered tutorials between Wednesday, March 25th and Friday, March 27th and have not received them, please let me know ASAP.


I received a lot of fun pictures this week from some very creative stampers who have made projects from the tutorials they purchased.

Before I share those, I want to tell you about a very important fundraiser going on at Splitcoast Stampers to raise funds for the Victorian Bushfires in Australia.


I have a lot of blogging friends and customers in Australia and have donated a few items to the cause. Please check out the details of the non-raffle here and view the amazing items in the non-raffle prize gallery here. To date the non-raffle has raised over $2000, but we can do better!


The date for the raffle has been extended to April 3rd.


_________


Nancy Horn, a fellow Idaho demonstrator from Jerome, made this one using the Cheap Talk set and Good Morning Sunshine DSP. She used vellum card stock for her inside pockets instead of transparency paper. You can see Nancy's blog here .


Kathy Orta, one of my newest demonstrators in FL, made this Milk Carton Container for Easter. Kathy is the queen of the Cricut!


Heather Heroldt of Scottsdale, AZ made her Tote-ally Awesome Tote with the retired Best of Cluck set. I miss those chickens, I loved that set!


Another very talented downline of mine, Paulina Hoang in Southern California, made Brownie Pops favors for her cupcake workshop! Paulina's favorite thing to do is combine her two loves, baking and stamping...with Stampin' Up! of course! ☺


And speaking of baking, Rebecca Ball, who's sister Emily is in my downline, made this adorable lady bug cake for a lady bug baby shower she gave.


How's that for a weeks worth of sharing all in one long posting!


Wednesday, March 25, 2009

Spring Break Vacation

I'm off for a little Spring break vacation with my family. I'll be back to posting this weekend.
Orders will be sent out every evening while I'm gone
.

Sunday, March 22, 2009

Designer Desk Set Tutorial is Now Available for Purchase

It's ready!

Designer Desk Set tutorial is now available.

$3.95


This 22 page tutorial contains step by step cutting instructions and color photo directions for completing the 3 Drawer Chest, 3 Part Stationary Caddy, 2 individual full size card Magazine Holders, and 4 cards.

The Caddy and Magazine Holders are for full size cards (4-1/4" x 5-1/2"). It is the SAME Magazine Holder I created for my October 1st posting, which was the first day of my 12 Days of Christmas tutorial set.

Some of the early comments noted a similarity of the Magazine Holder to the Filled With Flair template created by Lauren Meador for Papertrey Ink. However, my Magazine Holder was released in October 2008 and predates Lauren's posting by 6 months. This tutorial is based on my original design from that October Tutorial and not on any works by others. A link is provide above so you can verify the date and authenticity of my Magazine Holder posting. Thank you.


Saturday, March 21, 2009

Tutorial Sneak Peek #2

Here are two more pieces to see for sneak peek #2 of my latest tutorial, Designer Desk Set.
It contains 3 darling desk top pieces and 4 cards.


How about a Sunday release? Are you ready?


Friday, March 20, 2009

New Tutorial Sneak Peek #1

Here is the first sneak peek of my latest tutorial, Designer Desk Set.
It contains 3 darling desk top pieces and 4 cards...hang on, there is more to come tomorrow!

Thursday, March 19, 2009

Scallop Cupcake Quickies

That kind of sounds like a recipe doesn't it?
Well these are quickies as I call them...quick, easy and disposable for kid birthdays. We always need something last minute so I made a few to have on hand.

The little card base is the Circles, Scallop #2 die cut for the Big Shot. They are about 3 1/2" in diameter. Fold the DSP in half then run it through the Big Shot leaving a folded edge uncut for the top opening. I used my 1/8" hole punch to add little holes in the scallops. The cupcake is from the new Wagon Full of Fun set in the Spring Mini Catalog. I cut the frosting off and attached it with a Stampin' Dimensional. The beads are the Soft Subtles ones we used to carry but I see now that they aren't in the catalog...oops!
So...you wonder where I've been for the last couple days?
I 'm wounded...I had a horrible Circle Scissor accident!!!!!!!!! You know that new weapon Stampin' Up! sells called the Circle Scissor Plus?? Well, evidently if you read the directions you will find that the guard tip to the cutting blade slides off quite easily to the side. If you do not read the directions because this the 99th circle cutter Stampin' Up! has switched too and you are sick of constantly replacing yours, and try to pull it off...then try harder to pull on it because it is new, then once more because you're now mad...you get a 2" slice across your finger tip which if you look at your finger, you will notice that is almost the size of your entire fingertip. Yep! I cut it BAD!!! But I made the little cards anyway with the new Circle Scissor Weapon.
_____________
Take a look at this ambitious stamper! These come from Audrey Girard a Stampin' Up! demonstrator in Shawinigan, Québec, Canada.


Check out Audrey's blog here if you can read French. I just read pictures ☺


Monday, March 16, 2009

Leprechauns and Watercoloring

I've had several e-mails requesting the leprechaun instructions, so just in the nick of time...here you go!
Punches used are the Key Tag, 1 3/8" Circle, Word Window, 1/2" Circle, 1/4" circle, 5 Petal Flower, Circle Scallop and a 1/4" strip of black cardstock. Cut the key tag in half for the hat. The rest is pretty self explainatory.
_________
My water coloring technique.
This is just what works for me. I use the same principals with watercolor crayons, pencils and pads or re-inkers. This example is done with watercolor crayons.
Click on each picture for a close up view.
LEFT: Scribble Creamy Caramel all over, leaving a small spot in the middle of the vase that will remain white. This lays down a nice foundation for the colors.
RIGHT: Blend with a Blender Pen in a circular motion all over. Make sure your blender pen is nice and fresh, dryish ones are yucky!

LEFT: Scribble flower colors and leaf colors on. I used Brocade Blue, Perfect Plum and Garden Green.
RIGHT: Blend all colors in a circular motion. Blend all the blue, clean the pen, blend all the purple, clean the pen, etc.

Sorry this one is blurry.


LEFT: Add darker colors. I simply drew a circle around each center. I used Night Of Navy for the blue, Elegant Eggplant for the purple and Always Artichoke for the green. Add Chocolate Chip to the left, right, under the foliage and to the inside lip of the vase.
RIGHT: On the flowers, blend the darker color from the center to the outside, stop short of reaching the outside so you leave some of the original color showing. Make it nice and dark and intense in color. Blend the Chocolate Chip in a circular motion towards the center of the vase. Make sure to leave the white spot for highlighting in the center.


LEFT: Add little bits of More Mustard to the centers of the flowers and here and there to a few petals and leaves. Further deepen the centers with a hint of Chocolate Chip. Add additional Chocolate Chip to the vase to make it nice and defined. Finally, add an outline of Basic Gray to the entire image.
RIGHT: Blend, blend, blend. Enjoy!

Sunday, March 15, 2009

Yesterday Stampin' Up! announced a great new way to become a demonstrator...
The 3 Easy Payment Plan!
Fabulous idea if you ask me, since we are all feeling the crunch of the lovely economic times and REALLY NEED our discount on our stamping supplies!!!
This limited time offer allows you to make a partial initial payment and still receive the Starter Kit right away. Read about the Starter Kit here (including details on how to join)
3 PAYMENT DETAIL:
  • Payment #1 (charged when you order) -$56.34 (+ sales tax)
  • Payment #2 (charged April 15) - $56.33
  • Payment #3 (charged May 15) -$56.33

JOIN BEFORE MARCH 31 AND YOU WILL:

  • Save 15% OFF the Starter Kit (regular price is $199)
  • Choose a FREE stamp set - valued up to $47.95 (get a huge alphabet set or something really cool!)
  • Receive a special hand stamped gift from ME ☺

SIGN UP IS EASY:

  • Start by printing the order form and customize your started kit.
  • Fill out the 3 Easy Payment form
  • Contact Me -paperwork must be mailed to Stampin' Up!. You cannot join online if you want to take advantage of the payment plan.
It's the perfect time to be a Stampin' Up! demonstrator! You can simply enjoy the discount for yourself or start a club by stamping with a few friends each month or make it a full time business. In my 7 years as a demonstrator, I have never had a day where I hated my boss or worried about getting laid off ☺
Do I look like I'm having fun??? I LOVE this job!
I would love to have you join my Inking Everything Team!
If you have any questions please e-mail me. I'm here to help you benefit from doing what you LOVE!
______________
Now onto the stamping...
Cardstock: So Saffron, Chocolate Chip, Whisper White, Sweet Slumber DSP
Stamp Set: A Good Egg
Accessories: Watercolor Crayons, Blender Pens, SAB Ribbon Bundle, Eyelet Border Punch, Pumpkin Pie Marker

Cardstock: Chocolate Chip, Tangerine Tango. Rose Red, Pink Pirouette, Whisper White, Sweet Always DSP
Stamp Set: A Good Egg

Accessories: Baskets and Blooms die cut, Big Shot, 1" Chocolate Chip Stitched Grosgrain and 1/4" White Grosgrain Ribbons, Regal Rose Grosgrain Ribbon, Pig Tails Ribbon Originals, Watercolor Crayons, Blender Pens, Stampin' Dimensionals


Becky's Tote-ally Awesome Tote stamped by Kathy Orta


Becky's tote-ally Awesome Tote stamped by Tashana Lundy.

Beautiful work ladies! Thank you for sharing.

Saturday, March 14, 2009

Cupcakes and Chicks

I made a little bag out of 2 cupcakes I had left over from this posting for my hostess last night as her thank you gift.Cardstock: Kiwi Kiss, Pink Pirouette, Chocolate Chip, Whisper White
Stamp Set: Simple Birthday Thanks
Accessories: Paper Crimper, tiny pom poms, Red Microbeads, 1" Chocolate Chip Stitched Grosgrain Ribbon, Jumbo Eyelets
Cardstock: Parisian Breeze DSP, Chocolate Chip, Whisper White, So Saffron
Stamp Set: A Good Egg
Accessories: Watercolor Crayons, Blender Pens, Baja Breeze Striped Grosgrain, Stampin' Dimensionals


Thursday, March 12, 2009

Karen's Show


Projects for Karen's show Friday night.

Wednesday, March 11, 2009

More Toolin' Around

I'm still playing with my Totally Tool stamp set. I found a couple cards I wanted to CASE with this set and had so much fun playing with it! My husband was far less impressed...something about how the tools look like a bouquet of flowers or some nonsense. Who listens to him anyway!!

CASED from Jenn D, you can see her card here.

Cardstock: So Saffron, Whisper White, Basic Black, Sweet Slumber Specialty Designer Series Paper
Stamp Set: Totally Tool
Accessories: Watercolor Crayons, Blender Pens, Stampin' Write Markers, So Saffron Striped Grosgrain Ribbon, Stampin' Dimensionals

CASED from Andrea Walford, you can see her card here.
Cardstock: Riding Hood Red, Whisper White, Basic Black, Sweet Slumber Specialty Designer Series Paper
Stamp Sets: Happy Everything, Totally Tool
Accessories: Watercolor Crayons, Blender Pens, Stampin' Write Markers, 1/2" Circle Punch, 5/8" Brads in Silver, Stampin' Dimensionals

Tuesday, March 10, 2009

Hit The Nail On The Head!

These quick notes are for Nicholas to write his birthday thank yous. I used the new Totally Tool stamp set. Maybe guy cards will get easier now with this set!

Cardstock: Going Gray, Whisper White, Real Red, Basic Black
Stamp Set: Totally Tool

Accessories: Real Red & Going Gray Marker, Blender Pens, Going Gray ink pad, Black Brads
___________
Valentine's Box by Tammy Beaver
Tammy made some creative choices with the Big Shot die cuts for the fillings in her box. You can view her blog here
She also has a cool tutorial on making rustic barn stars!
___________
Check out this Tote-ally Awesome Tote made by Liz Holloway.
Tote-ally darling, I must say ☺


You know how much I LOVE Bella Rose papers so I had to show you all the pictures of her work. You can view her blog here.