 My Snow Much Fun Stamp Camp is this Saturday. I still have a couple of open spots. E-mail me at yasou@cableone.net if you are interested and I'll send you a registration form.


 My Snow Much Fun Stamp Camp is this Saturday. I still have a couple of open spots. E-mail me at yasou@cableone.net if you are interested and I'll send you a registration form.
 Time to make Christmas stationery for the month of December. These are single card fronts to use for quick notes and thank you's.
 Cardstock: Real Red, Very Vanilla
 Last Saturday I participated in the annual Holiday Bazaar at Nicholas' old elementary school. It's always so much fun to see those friends again!
 My upcoming stamp camp on December 3rd, Snow Much Fun.

 This year for the first time, I offered a make-n-take. We did the punch art Santa with red licorice in the cello bag. The idea came from the stamp day I participated in while at Founders Circle. Thank you to my friend and downline Dianna Johnson, for taking charge of the make-n-take for the day!
 Display boards
 The lineup!
 Nicholas was up first with two 'smashing' hits!
 Oh what a mess!
 Next up Benjamin, he wanted to hit the small pumpkins first. Not too much mess from those.
 So he went for a bigger one and yep, he's wearing a lot of it on his face!
 Never one to sit on the sidelines, next at bat was dad! Standing guard over the situation is Sarah the retriever, catcher and fetcher. Oh how she loves this game!
 And taking one for the team - mom, the pitcher who wore a little bit of every smashed pumpkin on her face, in her hair, you name it! Oh the things she will do for her family!
 Another thing I'm thankful for is a job that I love! Stampin' Up! has brought many gifts into my life - friendship, relationships, creativity, freedom to work when I want to work and most of all rewards for doing my job. This week I earned an all expenses paid vacation to Fiji from Stampin' Up! for 2013. Thank you Stampin' Up! and thank you to my fabulous downline and customers!
 Cardstock: Pool Party, Old Olive, Whisper White
 I always put a little thank you for ordering in the bags for my Stamp Club girls. This month we played with the new Peekaboo die-cut so I used that for the thank you's.
 I seriously hate doing multiples but I sure love looking at them!
___

SAVE 20 to 60% on Stampin' Up! products! The Stampin' Up! On-Line Extravaganza Sale is here! click HERE to find the On Line Extravaganza Sale.
The On-Line Extravaganza Sale ends Nov. 30.
To see everything on sale during the On-Line Extravaganza, click HERE for the PDF link.
There is no minimum purchase required to participate in this promotion.
For product bundles, you must use the bundle item numbers provided. Bundle discounts will not be applied if individual item numbers are used.
Additional products from current catalogs may be purchased on the same order.
Discounts range between 20 and 60 percent.
24 HOUR SALE TODAY ONLY!!!
For the next 24 hours, take advantage of a 20% discount on two of Stampin' Up!'s hottest new products, Simply Scored Scoring Tool and Sweet Pressed Cookie Stamps.
The 24 hour sale ends at midnight MST today!

122334 Simply Scored Retail Price $29.95 Sale Price $23.96

125152 Sweet Pressed Cookie Stamps Retail $16.95 Sale Price $13.56
Don't miss out on this fantastic 24 hour HOT HOLIDAY SALE!!

 Here he is doing his demonstration. It was fantastic but it got better when he previewed almost everything from the new Occasions Mini Catalog coming up in January!!!
 All of the girls in attendance from that group made Spencer a gift. They gave him this darling bag made with the Big Shot and the Timeless Portrait Fabric stuffed full of gifts. all that stuff on the table came out of the bag. It was so cool!
 At the end of his presentation he sang for us. Simply AMAZING as it always is each time he sings at SU! events!!!
 These are the items I demonstrated, mostly using the Sweets for the Sweet stamp set.
 Their make-n-take was this clutch purse wallet gift card holder. The pattern for this is available in the 12 Days of Christmas 2011 edition tutorial available on the right hand side bar or the tutorials page of this blog.
 A closer look at the tag for the bag of candy. I used the Peekaboo Frame die-cut.
 Same Peekaboo Frame die-cut on the end of the cello bag.
 The card to match.
 There were about 40+ in attendance, a great turn out for a Friday all day event.
 Hat is the 1” Square Punch - round the top corners with the Corner Rounder. Brim is the Word Window Punch. Cherry Cobbler Waffle Ribbon for hat band and Boho Blossoms flower in Silver Glimmer paper for the snowflake. Tie a Cherry Cobbler Bakers Twine bow.
 This is where I will be Saturday if you would like to come by and visit!
 Candy treats using the Two Tags die-cut.
 Cardstock: Old Olive, Whisper White, Silver Glimmer Paper
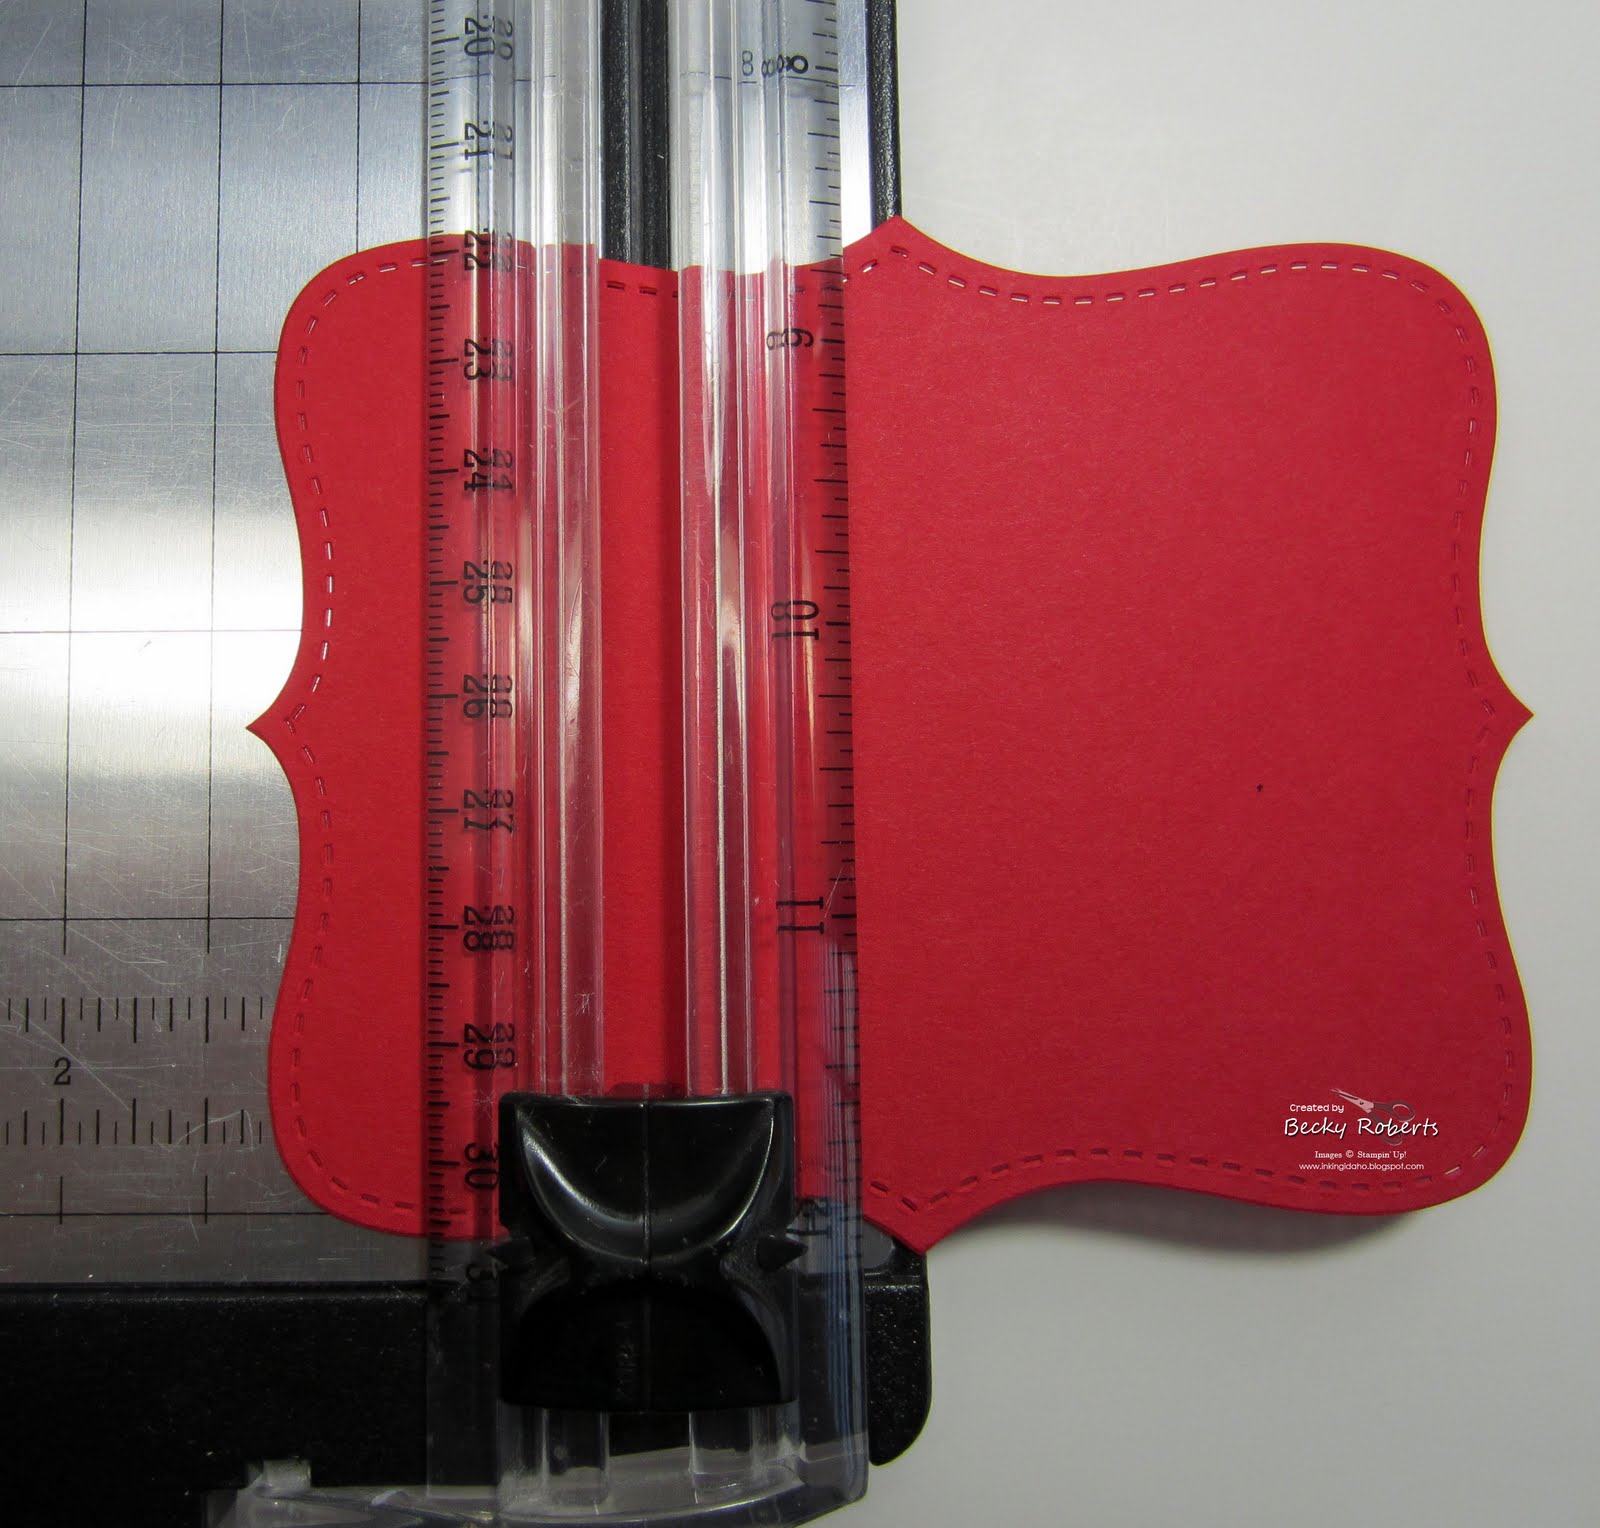 Die cut the Top Note with the Big Shot. Place it in the paper cutter with a scoring blade. The middle points of the Top Note are lined up with the outside of the paper cutter OR at approximately 1-1/4".
 Die cut a piece of Designer Series Paper with the Top Note and cut it off to fit just under the score line. Trim on the perforated line so it fits inside.
 Punch two holes for the handle on the back side of the score line. Cut ribbon to about 8' long. Place one end through each hole and secure to the top of the Top Note with a Mini Glue Dot.
  Small flat cello bags from Stampin' Up! trimmed to about 3-3/4" long. Put the candy in the bag, fold the bag over about 3/4" - 1" until the bag is level with the bottom of the purse. Fold on the score line and staple closed.
 Cover the staple with an embellishment.


