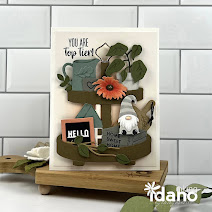
Hey, hey, Saturday was MY day on UStamp with Dawn and Friends. This is one of my two projects for the Spring Soiree. If you would like the directions to this project and a whole months worth of other projects, come on over to UStamp HERE.


 Hey, hey, Saturday was MY day on UStamp with Dawn and Friends. This is one of my two projects for the Spring Soiree. If you would like the directions to this project and a whole months worth of other projects, come on over to UStamp HERE.


ETA: Please feel free to leave a comment but a winner has been chosen and will be announced soon. Thank you!
 Giant Nugget Box from Cannie Hunter, you can view her details HERE.
 This one was on Splitcoast Stampers and is from Theresa Forseth. You can also see it on her blog HERE.
  This card box looks like a book and can hold a dozen or more cards.

 If you are interested in the pattern for this project, check out UStamp! You'll get this one and the entire Holiday Session for $ 24.99!!

 My project is a Christmas Organizer.
 And now for the big announcement...........I've been invited back!! Yeah me!! This time I am a Creative Crew Girl and I will be designing 2 projects exclusively for UStamp members!
 You want to join me?? UStamp is offering a FREE tuition for me to give away!! Valerie Durham was my winner of a paid tuition for the Fall session and you could be next!!
All you have to do is leave me a comment telling me why YOU should win. Please leave your contact information. Last time some of you had the correct answers to the questions I asked but there was no way for me to contact you.
If you have already paid and are a winner, no worries, your money will be refunded.
9/29 The contest is now closed. I have a winner!!! Just waiting on Dawn to let me know when I can announce it. Thank You to all who left comments. That was AMAZING!!
___________
 This is my first time ever with UStamp. For those of you who are not familiar with UStamp, here is Dawn in her own words:
  1. Cut cardstock to 2-1/4" x 5-3/4".
  7. Apply SNAIL adhesive to back of the center punched oval and start layering the ovals on the left and right sides alternately.
9. Fold the box and secure with Sticky Strip.
10. Attach pumpkins to the front and back of the box.
11. Hand cut little stems and stamp leaves if desired.
 12. Attach handle with a brad.