


Fabulous idea if you ask me, since we are all feeling the crunch of the lovely economic times and REALLY NEED our discount on our stamping supplies!!!
This limited time offer allows you to make a partial initial payment and still receive the Starter Kit right away. Read about the Starter Kit here (including details on how to join.)
3 PAYMENT DETAIL:
Payments breakdown for the Starter Kit Price of $199 (April 1-30)
Payment #2 (charged May 15) - $66.33
Payment #3 (charged June 15) -$66.33
JOIN BEFORE April 30 AND YOU WILL:
Start by printing the order form and customize your started kit.
Fill out the 3 Easy Payment form
Contact Me -paperwork must be mailed to Stampin' Up!. You cannot join online if you want to take advantage of the payment plan.
It's the perfect time to be a Stampin' Up! demonstrator! You can simply enjoy the discount for yourself or start a club by stamping with a few friends each month or make it a full time business. In my 7 years as a demonstrator, I have never had a day where I hated my boss or worried about getting laid off ☺
Do I look like I'm having fun??? I LOVE this job!
If you have any questions please e-mail me. I'm here to help you benefit from doing what you LOVE ☺

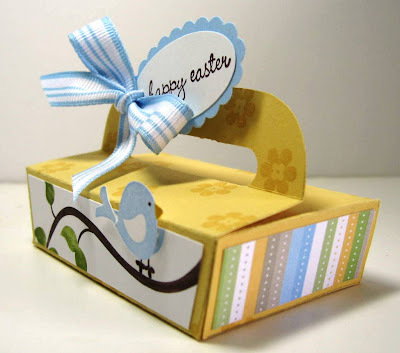
Nicholas had this little box of candy and the whole time he was eating it I was thinking that would make a really cute box for Easter. It took him 2 days to finish munching on them before I could swipe the box! I felt like I was stalking my own kid!!
I opened the box and traced it for a pattern onto Barely Banana cardstock then added a few finishing touches with the Cheap Talk set and the Sale-a-bration DSP.
___________
Paulina's Brownie Pops per your request!
I always fascinated about the e-mail I receive. The Brownie Pops were the hot topic since I posted it last week. After 61 e-mails, I contacted Paulina and told her her fans were demanding details...Here you go!


Tool: Wilton Brownie Pops 8-Cavity Silicon Mold
http://www.wilton.com/store/site/product.cfm?id=AF3F6982-1E0B-C910-EA22596AF53FAE39
Ingredients Brownies:
1 package of Duncan Hines Family-Style Brownie Chewy Fudge mix (Yields 20 Brownie Pops)
2 eggs
¼ cup water
½ cup vegetable oil
Décor Ingredients:
Wilton Chocolate Candy Melts of any colors preference
Sprinkles
4” lollipop stick
BBQ skewer
Clear treat bags, medium size (6” x 4”), trim the length to 4 ¼”
Directions:
Preheat oven at 350 F regular or 325 F at confection
Spray generously with Pam – Baking into the holes
Follow instruction from the mix and fill the holes with ¾ of the brownie mixture
Bake for 35 minutes
Remove from oven, then immediately trim the “over baked” side and top if any with a kitchen knife while they are hot
Let them cool in the pan for about an hour, they came out easily and kept shape
Decorate by dipping the flat part of the brownies in chocolate candy melts, rolled in sprinkles or nuts and set them on wax paper. Using a BBQ skewer to poke a hole on top about ¾ thru the brownie then immediately insert the lollipop stick. Refrigerate for 15 minutes for chocolate and sprinkle to harden and settle-in.
Bag brownies immediately to avoid dryness. Here come the fun part…Use SU products to pimp-up brownie pops and you’ll be the HERO at any gathering. They are not only yummy but super cuties. Enjoy!
Useful Hints: The process is time consuming, if you need more than 8 pops, get more molds or plan for more than 1 ½ hours per mold before even decorating. Mold can be purchased at Michael’s or Jo-Ann Fabric. Wilton.com is sold out. Good luck!!!


That little box is SO cute! Do you have a pattern to share with us? I'm up in Canada and haven't seen it here. *POUT*
ReplyDeleteFor those who love the brownie pops idea, but don't want to spend the $10 for a mold, I made some using a mini muffin pan. It took about 18 minutes for them to cook in my oven. What a lot of fun they are to make!
ReplyDeleteLove your box - it made me laug thinking of you stalking your own son!!
ReplyDeleteThose Brownie Pops look fab - such a great idea! Thanx for getting the recipe for us.
xXx
Thank you for sharing this. My son's birthday is on the 10th and he wanted brownies with blue icing and star shaped sprinkles. This will be perfect for 4 and 5 year olds. Thank you, thank you, thank you!
ReplyDeleteOh my goodness that little box is so cute, everything to make is so cute. Please, please share the pattern with us. I have an easter swap with 3 gals and would love to make them one.
ReplyDeletegreat box. stalking your son . . . too funny.
ReplyDeletexox
You have done it again. This is too cute of a box. Your staory about stalking you son sounds like something I'ld do. Now I"ve got to go to Wal-mart and see if I can find one of this boxes! The brownie bites are too cute too!
ReplyDeleteBecky, you never cease to amaze me! That Easter box is AMAZING! So stinkin' CUTE!
ReplyDeleteYum! Those brownie pops are awesome!
WOW too cute. Please share your idea. I willing to pay 3.95 for the easter box.
ReplyDeleteDarling box~!!! lOl how funny about waiting to swipe the box!!LOL
ReplyDeleteLove your ideas they are great and thank you for sharing with us!!!
Totally LOVE what you've done with this box! I know what you mean about "stalking" family for a container - I've done the same myself! Thanks for all your inspiration - I've bought a tutorial for the Tote-ally Awesome tote and can't wait to try it! Best wishes, Kez
ReplyDeleteI love that little box! SO cute!
ReplyDeleteHow cute is that box, I would love a copy of the template if you are sharing.
ReplyDeletethanks, you have the best ideas.
Tammy
v_gal33@yahoo.ca
Great Blog, I agree with you.Please keep www.myeasypayment.com at your good work, I would come back often.
ReplyDeleteLove your box - it made me laug thinking of you stalking your own son!!
ReplyDelete___________________
Julie
Lock in your price today for Your favorite
channels - and keep it there until 2010!